
chatGPT를 이용한 워드프레스 블로그 글쓰기 완전자동화 #2
Previous Post: chatGPT를 이용한 워드프레스 블로그 글쓰기 완전자동화 #1
Previous Post: Fully automated wordpress blog writing using ChatGPT #1
카테고리 추천 받기
Request category recommendation
본인이 운영할 블로그의 주제를 우선 정한 후 chatGPT를 통해 카테고리를 추천 받는다.
At first determine the topic of the blog, and then get category recommendations from chatGPT.
필자의 블로그 주제는 “스쿠버다이빙”으로 정하고 chatGPT에게 질의를 통해 20개의 카테고리를 다음과 같이 추천 받았다.
my blog topic is “Scuba Diving” and 20 categories were recommended through a query to chatGPT as follows.
우선 chatGPT에 질의할 질의문을 다음과 같이 만들었다.
I made the following inquiry to chatGPT to get category recommendations for their blog with the theme “Scuba Diving”.
내 블로그는 “스쿠버 다이빙, 프리다이빙 등”에 관련된 블로그이다. 블로그에 맞는 20개의 카테고리를 복사 가능한 CSV 파일 형태로 만들어라.
my blog is about scuba diving, free diving and etc. please recommend 20 blog categories fit to this blog. please change this to .csv format and make this copyable.
아래와 같이 복사 가능한 형태로 “하위 카테고리”,”상위 카테고리”를 추천하여 주는 것을 확인할 수 있다.
we received recommendations for “Subcategory” and “Parent Category” in a copyable form as follows.
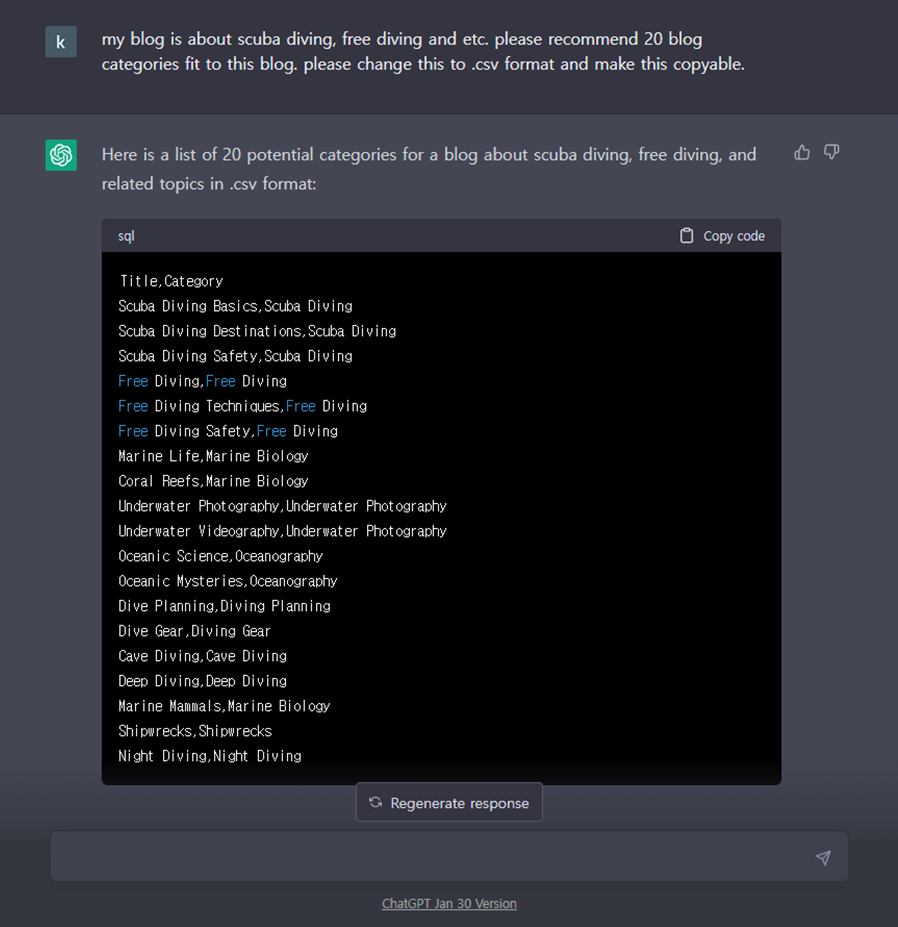
“Copy code” 버튼을 클릭하여 복사한 후 Notepad에 붙여넣기를 한다.
Click the “Copy code” button and paste it into Notepad.
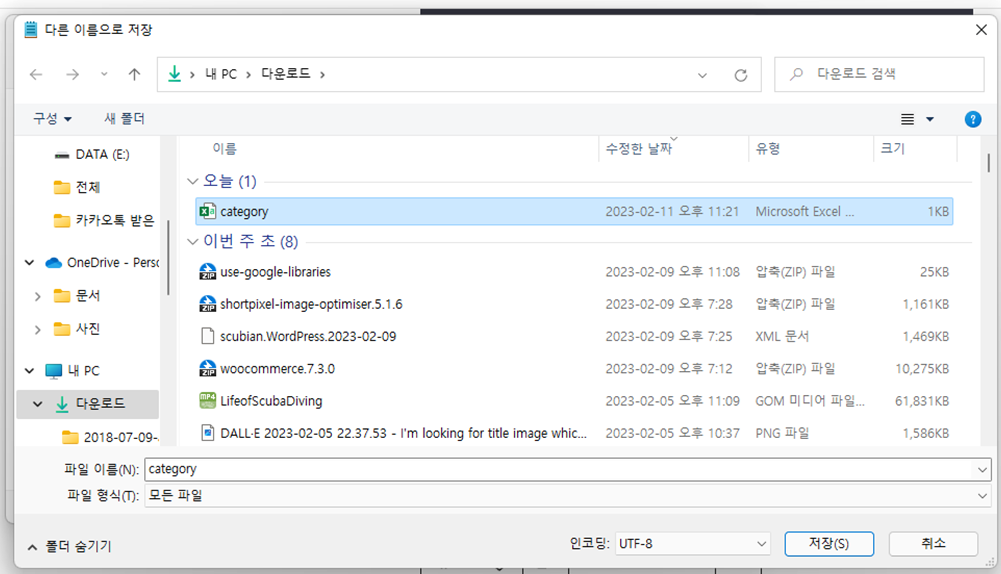
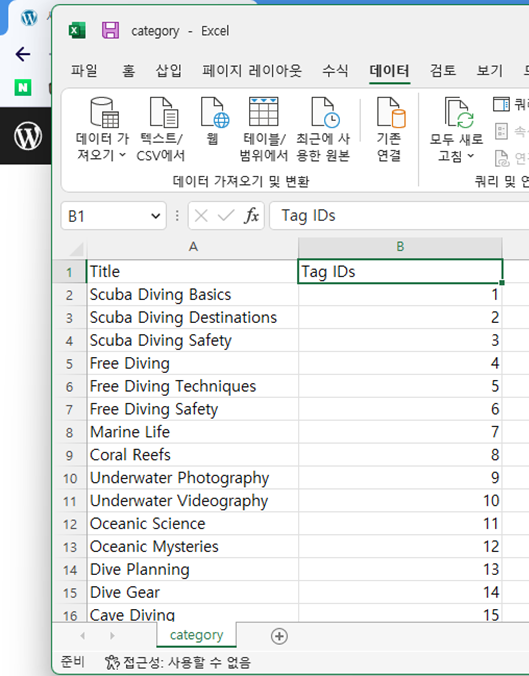
“다른 이름으로 저장하기” 버튼을 클릭하여 category.csv 파일로 저장 후 더블클릭하면 엑셀에서 확인할 수 있다.
Click the “Save As” button to save the file as a .csv file called “category.csv”. Double-click the file to open it in Excel and view the content.
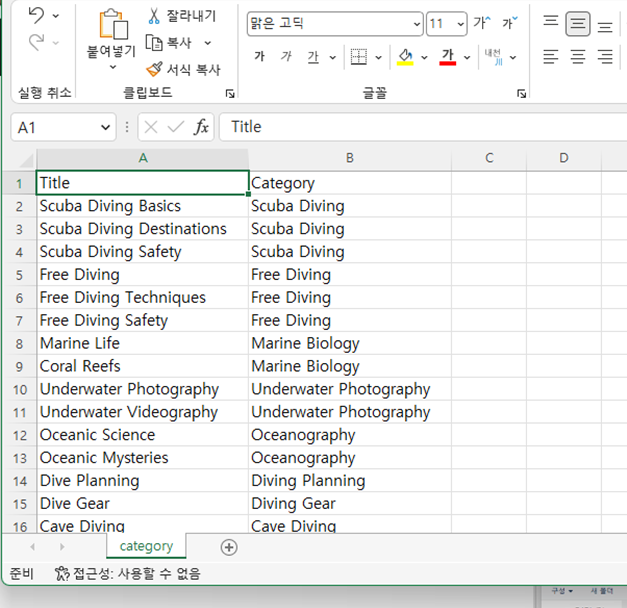
Title 부분을 사용하는데, 추가/삭제 하고 싶은 카테고리가 있으면 수정하도록 한다.
We will use title field. Make changes to the title as needed by adding or removing it.
워드프레스에 카테고리 등록하기
Register categories in WordPress
위에서 만든 카테고리를 워드프레스 > 글 > 카테고리 메뉴에서 추가하도록 한다.
Add the categories created above in the WordPress > Posts > Categories menu.
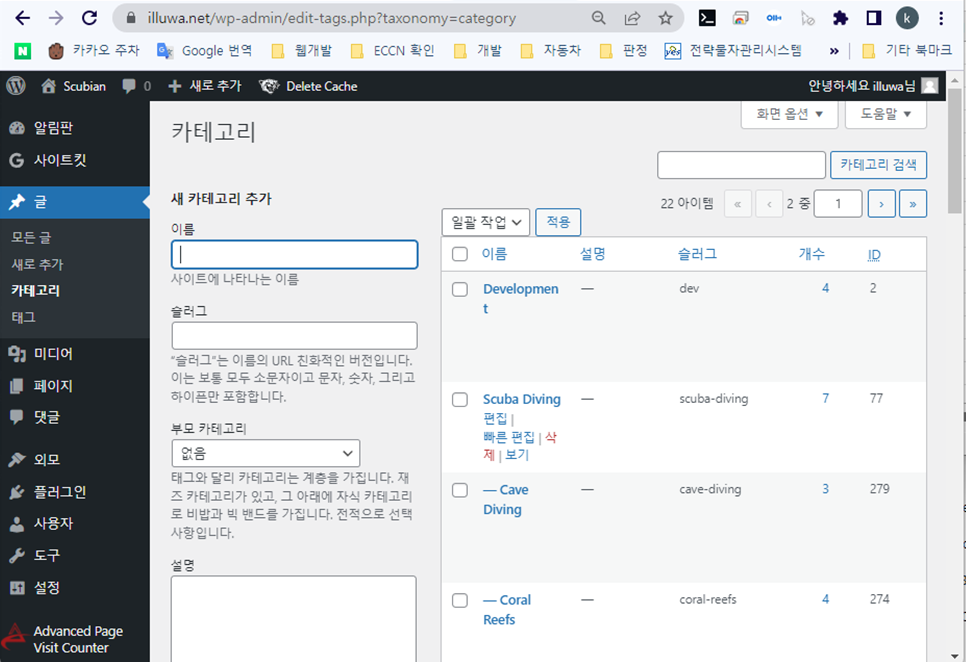
여기서 우리가 필요한 것은 추가된 카테고리의 “Tag ID” 이다. Tag ID는 생성된 카테고리에 마우스를 올렸을 때 하단 주소표시줄에서 확인이 가능하다. 좀더 편리한 사용을 위해 “Reveal IDs” 플러그인을 사용하면 필자처럼 카테고리 화면에서 바로 확인할 수 있다.
What we need here is the “Tag ID” of the added category. The Tag ID can be confirmed from the address bar at the bottom when you hover over the created category. To make it more convenient to use, use the “Reveal IDs” plugin so you can directly check the category screen like the author.

등록된 각각의 카테고리의 Tag ID를 위에서 만든 Category.cvs 파일에 기록하여 준다. 이대 Title만 남기고 Category Field는 삭제해도 좋다.
write the Tag ID of each registered category in the Category.cvs file created above. It is fine to delete the Category Field and only keep the Title.
Title 및 Tag IDs를 복사하여 Airtable에 옮기도록 하겠다.
Copy the Titles and Tag IDs to Airtable.
Airtable에 다음과 같이 Table을 만든다.
Create a table in Airtable with the following fields:
| No | Field Name | Field Type |
| 1 | Category Name | Single Line Text |
| 2 | Category ID | Single Line Text |
| 3 | Pulling | Single Line Text |
| 4 | Created | Created Time |
| 5 | Last Modified Time | Last Modified Time |
앞서 #1 에서 만들었던 My Blog Data를 다음과 같이 수정한다.
Modify the My Blog Data created in #1 as follows.
1. 제일 뒤의 + 모양을 눌러 “Links to other record”를 클릭한다.
Click the “+” symbol at the end to click “Links to other record”.
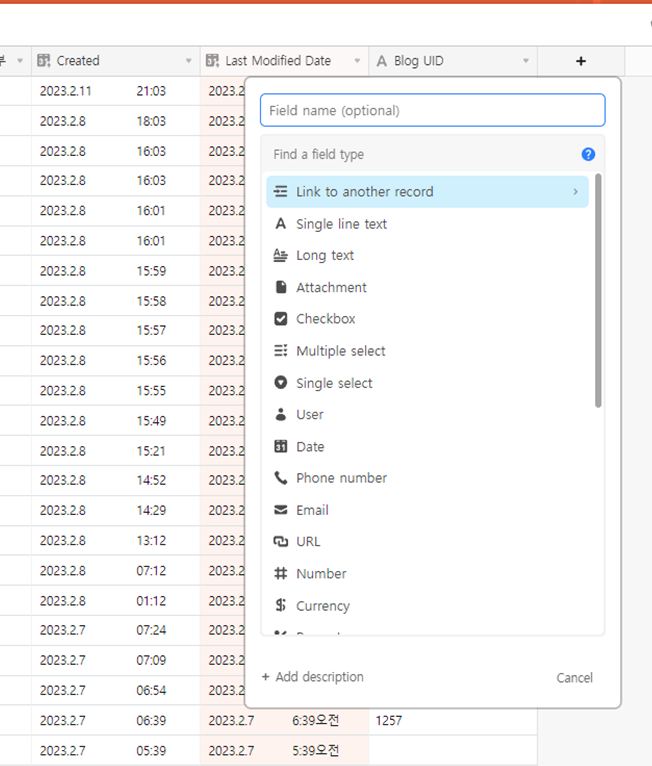
2. Category를 클릭하고 “Allow linking to multiple records”를 체크해 둔다.
Click on “Category” and check “Allow linking to multiple records”.

이렇게 해두면 “My Blog Data”의 Category Name에 앞에서 입력한 Category Name이 입력되면 wordpress의 Tag ID값을 자동으로 가져온다.
With this setting, when the Category Name entered in “My Blog Data” matches the Category Name entered earlier, the Tag ID value in WordPress will be automatically retrieved.
워드프레스에 태그 등록하기
Register Tags in WordPress
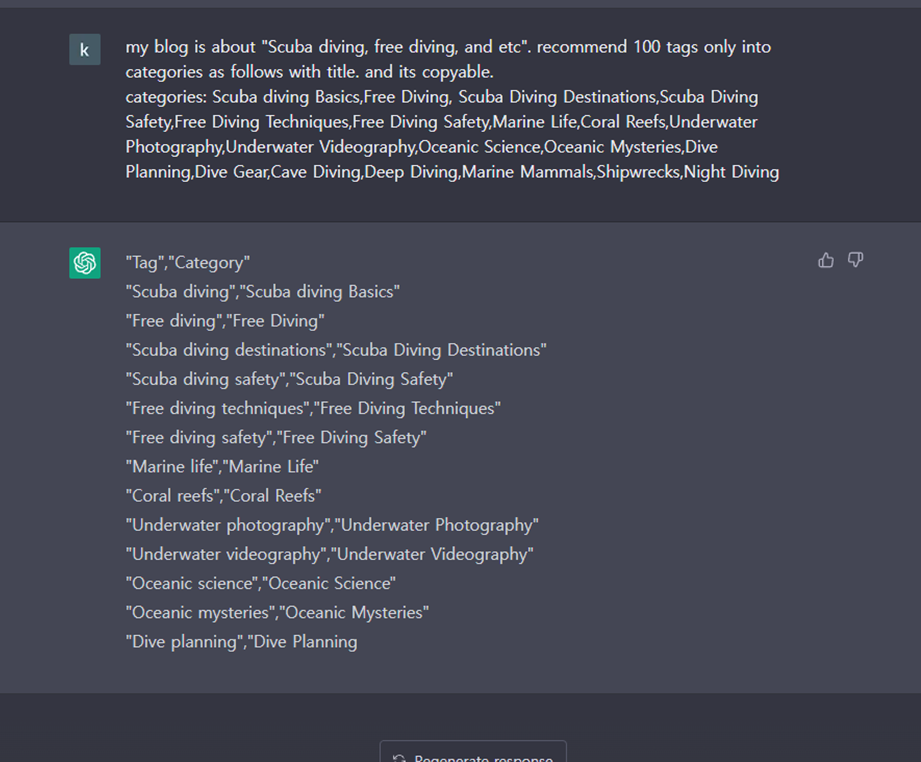
위에서 카테고리를 등록했을 때와 마찬가지로 chatGPT에게 적절한 tag를 추천받도록 한다. 보다 적절한 태그를 추천받기 위해 아래와 같이 질의문을 만든다.
Ask chatGPT for suitable tags, just like you registered the categories. Compose the following inquiry to receive more appropriate tags from chatGPT:
| my blog is about “Scuba diving, free diving, and etc”. recommend 100 tags only into categories as follows with title. and its copyable. categories: Scuba diving Basics,Free Diving, Scuba Diving Destinations,Scuba Diving Safety,Free Diving Techniques,Free Diving Safety,Marine Life,Coral Reefs,Underwater Photography,Underwater Videography,Oceanic Science,Oceanic Mysteries,Dive Planning,Dive Gear,Cave Diving,Deep Diving,Marine Mammals,Shipwrecks,Night Diving |
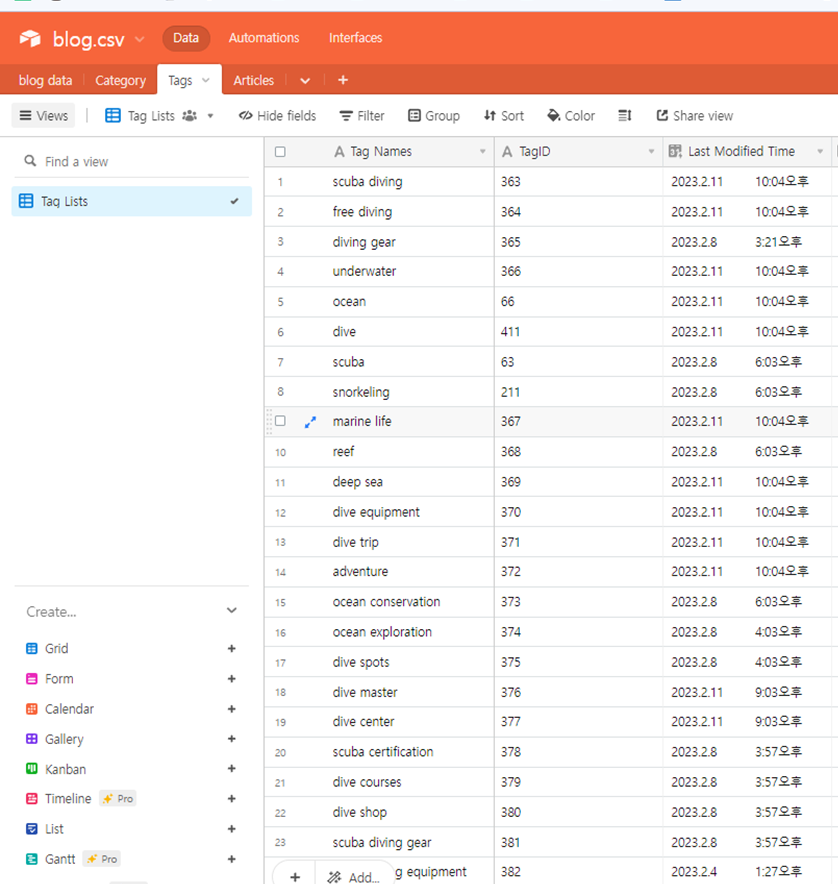
나머지 등록방법은 카테고리를 등록할 때와 같다. 워드프레스 > 글 > 태그 에서 등록해주고 TagID를 엑셀에서 정리한 다음, Airtable에 Tag Table을 아래와 같이 만들고 값을 복사하여 붙여넣기 한다.
The rest of the registration process is the same as registering categories. Register the tags in WordPress > Posts > Tags, and after organizing the Tag IDs in Excel, create a Tag Table in Airtable and paste the values by copying them.
| No | Field Name | Field Type |
| 1 | Tag Names | Single Line Text |
| 2 | Tag Id | Single Line Text |
| 3 | Created | Created Time |
| 4 | Last Modified Time | Last Modified Time |
다음 시간에는 드디어 pabbly를 이용하여 자동화의 첫 시작을 해보도록 하겠다.
Next time, we will finally start the automation process using Pabbly.